For rockhounds to locate collecting sites, such as mines and prospects, certain navigation skills and tools are generally required. Navigation is the process of planning, recording, and controlling the movement of a craft, vehicle or person from one place to another. The word
navigate is derived from the Latin roots
navis meaning "ship" and
agere meaning "to move" or "to direct." By this definition, rockhounds searching for an old mine or mineral deposit in the forest are often like ships in a sea of trees moving from a starting point to a collecting site. Different navigational techniques and tools have evolved over the ages in different cultures, but all involve locating one's position compared to known locations or patterns. In this day and age, the four main tools for land navigation include: 1) Road Maps; 2) Topographic Maps; 3) Compass and 4) Global Positioning Satellite.
Road Maps
The first rule of navigation: You must know your present location to be able to plot your course to the next location. A map with good detail and information is a must, and it must be current. If you are traveling from state to state, you will need a map showing the major roads. If you plan to visit a county to look around for a rockhound site, a good county map may be available from the local chamber of commerce or courthouse in that county.
Topographic Maps
Each state has an "Index Map" that shows the name and location of each topographic map in a grid pattern overlayed on the state map. You will need an index map to tell which area a map will cover. You can get an index map from your state geological survey or map dealer.
A topographic map gets its name several different ways: it may be from a town or some other location or feature located on the area that the map covers. The map’s name is located in the bottom right corner along with the year that it was published.
There are over 54,000 quadrangles (map sheets) that cover every inch of the United States. The USGS primary scale for mapping topographic maps is 1:24,000. This means that one-inch on the map equals 24,000-inches on the ground, the equivalent of 2000 feet. These size quadrangles are called 7.5 minute quadrangles because they show an area that is 7.5 minutes of longitude wide (east and west) by 7.5 minutes of latitude high (north and south). These paper sheets are approximately 29 inches high and 22 inches wide.
Topographic maps use a wide variety of symbols to represent human and physical features. Contour lines are used to represent elevation by connecting points of equal elevation. So these imaginary lines represent the actual terrain. A steep slope is represented by contour lines being close. Contour lines that are far apart represent a more gradual slope. When contour lines are extremely far apart, then the terrain is essentially flat. Each quadrangle uses a contour interval (the elevation difference between contour lines) appropriate for that area. While relatively flat areas may be mapped with a five-foot contour interval, rugged terrain may have a 25-foot or more contour interval so that individual lines may be seen instead of being on top of each other. The contour interval for each map is usually printed on the bottom center under the scale. Through the use of contour lines, an experienced topographic map reader is able to visualize the direction of stream flow and the character of the terrain.
Contour intervals are real important for hunting rocks and minerals in the mountains! Contour lines form "v" shapes in valleys or along stream beds. The point of the "v" always points uphill. On a topographic map, blue represents water. Green represents orchards and forested areas, white is cleared land. Purple markings are those that have been "photo-revised," or added to the map since the original map was published and the date of the revisions is noted. Red areas represent urban areas. Maps will often indicate special buildings of significance within the urbanized area, courthouse, etc and these are most often represented by black symbols. Roads and highways are represented in black and red.
The topographic map’s name, date published, scale, contour line intervals, revised date, road classification, are all on the bottom of the map. Both true north and magnetic north are also shown and they are not the same. The difference between the two is referred to as magnetic declination and this differs for each topographic map, although it rarely differs more than a few degrees.
One very important thing to note on a topographic map is the "polyconic projection"! This will tell you the "datum" of the map. If you get a Global Positioning Satellite (GPS) unit, it will ask you for the "datum" because this must be the same as the map that you are using! If you enter the wrong datum into the GPS it WILL NOT MATCH THE MAP YOU ARE USING! The datum is usually listed in the bottom left corner of the map.
Topographic maps are also available in digital format. You can get the 1:250,000, 1:100,000, and 1:24,000 for most states. They are called DRGs (digital raster graphics) and can be viewed with numerous DRG viewers or in GIS programs. They are just scanned paper maps that are projected to a certain coordinate system. Most states have their topographic maps downloadable for free, so you can print off sections if you want.
Another very good resource is the national map viewer put on the web by the USGS (this is something that you really need to have broadband to use easily). It is still a work in progress as they are adding topographic sheets as well as geological maps and a bunch of other things at the following website. http://nationalmap.gov/ Another good internet source is TopoZone that has most scanned topographic sheets on line at http://www.topozone.com/
If you plan to rockhound in known sites that can be reached by road, all you need is a good road map and maybe some friendly directions. But, if you decide to look for old mine sites, prospects, or geology formations, you will need navigation skills to make your trip a safe and more pleasurable one. Maps have a location language called "coordinates". In school we remember the teacher saying something about "latitude and longitude" but this was just something else we thought we would never use, until now. Coordinates come in different types of "languages", on a large scale the use of degrees/minutes/seconds (or decimal equivalent) are commonly used. Most geologists, search & rescue, and map users that deal with a smaller area use the UTM coordinates system. You MUST understand how to use a coordinate system in order to navigate using topographic maps, compass, and GPS.
Here are some links that can explain the UTM coordinate system...
The information that you read on the web about using the UTM coordinates system can be confusing. So, if you didn't understand how to use it, I will show you a simple "country boy" way when we talk about the GPS below.
Compass
A compass is your main tool! It is the navigation tool that always points North... unless you are standing at the North Pole (magnetic) then the only direction that it will point is South! There are many good compasses to choose from but the best is a Brunton Compass.
Brunton Compass
I found this site that has good basic info about a compass...
Click Here
Most compasses that you'll see read 0-360 degrees... 0-degrees is North, 90-degrees is East, 180-degrees is South, and 270-degrees is West. This "standard" type compass is called an "azimuth” compass.
Now we all know that geologists being a "little different" than the rest of us, will use a compass that's called a "quadrant or 0-90 quad". So, in some books or maps you might see a compass bearing stated... South 2 degrees East. (S2degE). On an azimuth compass this bearing would be 178 degrees. Another example might be North 25 degrees West (N25W). On an azimuth compass, this would be 335-degrees. But anyway, the following is a link that you might need to find out what direction some “ist” is trying to tell you. Click Here
If you begin at point A on the map and want to go to point B, you need to plot a straight line from point A to point B on the map, measure the azimuth and use your compass to follow this azimuth in the field. Since there are generally obstructions between different points, it is often necessary to plot a series of points to reach your final destination. This is especially true when your destination is far from your starting point. Using known and obvious landmarks such as road and trail crossing is the best way to achieve your final goal.
A compass can be used to mark your present location on a map if you can see and identify two or more landmarks in the area of your location. Position determination is performed by taking azimuths to at least two (biangulation) and preferably three (triangulation) visible landmarks that are also identifiable features on a topographic map. You MUST be positive about the identification of the landmarks! The problem I encounter most often is that I am unable to see two or three landmarks in the areas where I hunt for old mine sites or prospects! In many places in the forest, I'm only able to see just feet in any direction! This brings us to the fourth main tool...
Global Positioning Satellite (GPS)
According to the Department of Defense, “GPS is operated by the Department of Defense. It consists of a constellation of 27 satellites (24 active and 3 standby) in 6 separate orbits. It reached full official operational capability status on 17 July 1995. GPS users can obtain a 3-D position, velocity, and time fix in all types of weather, 24 hours a day. GPS users can locate their position to within ± 18 ft on average or ± 60 to 90 ft in a worst case."
When the GPS became a new navigation tool for public use it had one major fault: the US Government was involved! For security reasons, the US military placed an "error" in the system to make the civilian model less accurate than its military counterpart. This error was called "selective availability", making civilian units be off by as much as 150 yards! This gave a lot of bad press to this new tool and it was considered by many to be nothing more than a joke. After May 1, 2000, when the selective availability was removed, many GPS users found that the accuracy of GPS exceeds the resolution of U.S. Geological Survey topographical quad maps! The rules have changed!
Garmin states that, “Today's GPS receivers are extremely accurate, thanks to their parallel multi-channel design. Garmin's 12 parallel channel receivers are quick to lock onto satellites when first turned on and they maintain strong locks, even in dense foliage or urban settings with tall buildings. Certain atmospheric factors and other sources of error can affect the accuracy of GPS receivers. Garmin® GPS receivers are accurate to within 15 meters on average. Newer Garmin GPS receivers with WAAS (Wide Area Augmentation System) capability can improve accuracy to less than three meters on average."
This navigation tool has gotten more people lost than any tool in history for two reasons: 1) they think it's the only tool they need to navigate with and 2) they don't fully understand the instructions and how it's used! This you need to remember... Don't use the GPS as your only navigation tool, if you do, you'll be looking for trouble... not rocks! To understand some of the workings of a GPS, Garmin has a great site... Click Here
Now that you are familiar with all the navigation tools, I will show you how I apply each to find and locate prospects, old mines, and mineral deposits.
Part I
Over the years, I have found that the following method has proven to be an accurate way to navigate and save valuable time and steps while out in the real world. While it is not the only way to navigate to and from a location, it is the one that I have come to rely on after many years of beating the bush for corundum.
I use four different "tools" each time we go to the field to prospect a new location and the key word here is "NEW". These tools include: 1) Road Map 2) Topozone.com (topographic mapping); 3) GPS and 4) Compass. If you have gone to the same area many times, or it is a simple location, you may not need to depend on any navigation tools to walk the area. Knowing how to navigate and use coordinates will make your adventure safe and time saving, and who knows, you may even find the mother lode!
I use two GPS units in the field: one is an old Eagle that I bought when they were first made in the 1980's and the other is a small Garmin Etrex that I use as a backup and to make sure the Eagle doesn't lie. Both units are set to use UTM coordinates. But, are they accurate? You want to test them!? Open up another web page in separate window and perform do the following...
1. Go to TopoZones web site at Topozone
2. Go down to Universal Transverse Mercator (UTM) and enter the following numbers.
3. In the first block put the number "16", this block is marked "UTM Zone".
4. In the block marked "Easting" put the numbers " 0704245".
5. In the block marked "Northing" put the numbers "3892128".
6. Then click on the circle next to "NAD27" where it says "Coordinate datum".
7. Now hit "MAP".
If this was a smart bomb, you just removed my house from Tennessee!! You should see an "X" located on York Road – this marks the exact location of my house!
Now look at the top of the page, do you see "USGS East Cleveland (TN) Topo Map"? This tells you the name of the topographic map on which the coordinates are located... REMEMBER THIS!!! This is an easy way to find which topographic map you will need when you do your own map planning! Be sure to save the Topozone website to your "favorites" list as it will save you time trying to locate a topographic map on a State topographic map index!
If you want to see what difference the "Coordinate datum" makes, go back and change the "Coordinate datum" to the "WGS84/NAD83" setting, then hit "MAP", you will see that the mark is off by 250 yards to the south! The datum for the USGS East Cleveland (TN) Topographic Map is datum "NAD27". I will show you where to locate this info in the next part.
This is what the coordinates looks like on my two GPS...
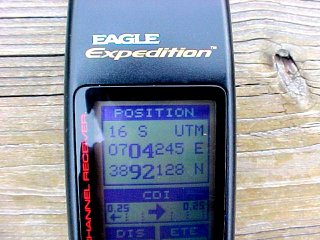
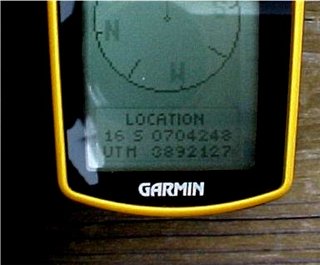
Notice the slight difference between the two. Both units were used today under heavy cloud cover on my back deck. On the Eagle, the "Easting number" says "0704245" and on the Etrex the numbers are "0704248", this is a difference of 3 meters to the east, or about 10 foot difference.
On the Eagle, the "Northing number" says "3892128" and on the Etrex the numbers are "3892127", this is a difference of 1 meter to the south, or a little over 3 feet.
By using this test to a known location, it checks the GPS and maps to see if everything is in working order before I hit the woods! Good idea.. Aye!?
In the next part we will see how to find and plot your coordinates on a map... Who knows, we might even find the Old Man's Ruby Mine!!
Part II
Each topographic map has the "UTM Zone" number printed in the lower left corner of each map. This will be the first number you will see when UTM coordinates are shown either in print or on a GPS display. Also the map "Datum" will also be printed in the same location. The datum of the map MUST match the datum set in your GPS, your instructions will tell you how to set the GPS to UTM coordinates and datum you need to match the map you'll be using.
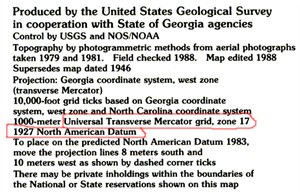
You may see the datum written, 1927 North American Datum, or NAD27.
To see the different UTM Zones you can go to this website... Farmworks.com
This next picture shows the bottom left corner of the Dillard, GA-NC topographic map. This map was made in the year 1988 and has the UTM coordinate lines printed on the map. If the map you are using is a pre-1986 map, you will need to draw the grid lines on your map yourself from top to bottom and from left to right using a ruler and pen. The same numbers are printed on opposite sides, so all you need to do is draw you lines to the same number on the other side of the map. Sometimes a number will be deleted and only a "blue tic mark" will be shown to indicate where the number is located.
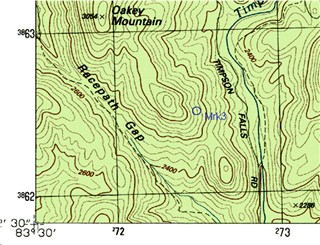
The circle on the map marked "Mrk3" is half way between both sets of grid lines. We also know that this map is in UTM Zone 17.
The coordinates for this location are:
17 0272500 E
3862500 N
The "17" is your UTM Zone number
The next four numbers (0272) you'll see at the bottom and top edge of your map and will increase every 1.000 meters going to the right or "Easting". If the first number is a "0", it may not be shown on the map (could be 272 instead of 0272).
The last three numbers (500), represents the distance in meters from number (0272) to the next number (0273). You will need to use the scale marked "METERS", which is located bottom/center of each topographic map, to determine the location of the last three numbers used with the UTM system. With "Mrk3" being half way between both grid lines, both coordinate numbers end in 500 (meters).
The next set of numbers will be the "Northing" numbers (3862) and are printed on the left and right edge of your topographic map and will increase going from the bottom of the map to the top. The last three numbers are the distance between these number in meters, the same way the last three numbers are used in the Easting numbers.
You can buy a ruler, or scale, that matches the topographic map at most map dealers or on the web. This way you can measure and plot the last three numbers in the coordinates and also the distance between different locations on your topographic map. The scale that's printed at the bottom/center of each topographic map is marked in both "Kilometers/Meters" and "Miles/Feet" which make it easy to convert either way.
Part III
A GPS will give you a fast and accurate way to find your present location and this is important because you must know this to establish the direction that you must travel to get to your final destination. It isn't always possible to travel in a straight line from your present position to your destination; for this reason I will check my location several times along the way and correct my bearing to bring me back on course.
The basics of navigation will tell you to pick a tree or other object at a far distance and walk to that point and then look for another on your bearing to walk to. The purpose of this is to minimize you veering off course as you try to maintain a true heading. In many of the areas I have hunted, this is just not possible! I have found out that the best way for me to navigate to a site is to go in a "general direction" rather that try and maintain a true compass bearing. I will correct my direction many times along the way after taking the easiest route around the many obstacles that I encountered in the forest. Walking a creek, logging road, or game trail will often be much better than trying to go through a thickly wooded area if it is going in the general direction of a bearing. Although I have to be careful to not continue to follow a road when it appears to bee heading off course just because it is easier than bushwhacking. I have had to backtrack many time to get back on course when a road has veered off in the wrong direction.
You may remember this from the McRocks' message board?
Are ya ready to go!?
This will be a simple trip just to show you the steps that are taken before I even leave the house.
I will try to plot the easiest path to a location from reading the map, I will note all junctions of road, water, or natural features on the maps I will be taking to the field. Many times I have found roads and other man made items are no longer at the locations I go to. The road you planned to walk may be nothing but a path after many years, most topographic maps are out-dated and things change, you can miss a turn-off or fork in a creek real easy!
The coordinates tells us that this is on the Shooting Creek Quadrangle (NC), and is in UTM Zone 17, and the Datum is NAD27. This trip is in the Chunky Gal Mountain area, in the middle of the Nantahala National Forest. This walk will be mostly along Tate Branch which has many water run-offs that are not shown on the map and many that don't have water during the summer, but we will use the forks as a reference for our location and distance traveled. This area is extremely thick and the branch is the best route and a good way to check for rocks and minerals that may have washed in from the sides of the cove. Each distance beside each coordinate is the distance from the starting point, this will let you time your travel. Oh, the time on your GPS will make a Rolex seem cheap!
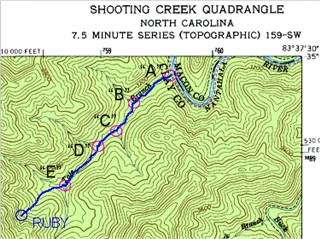
All info that will be needed is written down and taken on your trip. It's a good idea to make an extra copy to leave with someone so you can be located if you don't return at a set time! This is a "black area"... cell phones don't work. The point of entry is the road that runs beside the Nantahala River. Finding a road near your site is the first step, then back-tract it until you locate the best way in. The coordinates where the creek crosses the road ("A") are noted below. And easy way to find this point is to turn on your GPS and when you see "3880720N"... you are there. If you note where a road will cross either an "Easting" or "Northing" line, it will make it easy to find your turn off or entry.
Notes for the trip:
"A" 0259624E 3889720N Start
"B" 0259285E 3889480N 1,695'
"C" 0259122E 3889228N 2,965'
"D" 0258951E 3889094N 3,880'
"E" 0258655E 3888750N 5,840' (1.106 mile)
"R" 0258262E 3888500N 7,920' (1.5 mile)
General direction: compass bearing 227deg.(SW)
Climb: 560', 5% grade
If you aren't following a creek or road, you will need to plot your coordinates as you go, about every 100 yards or sooner in thick cover. When you get to location "E", you will need to take a compass bearing and stay to the right side of the hill with a check on your coordinates every 100 yards or less.
Before you take a trip to an area such as this one, practice in a small area that you know real well... the SAR will thank you!
Can you find ruby at this location?
No.. I don't think so?